Friday, March 11, 2011

Free MS office 2007 addon to Create PDF


Microsoft Office is one of the most widely using office processing applications but it not contains option like save as PDF. PDF format is also safer for us; we can avoid people changing the contents of the files. It is recognized as a standard document format. By using Microsoft Office Add-in, you can save all the Microsoft Office file extensions in PDF or XPS format. No need to install any software printers with this software’s.  Refer this article for creating pdf using Open office
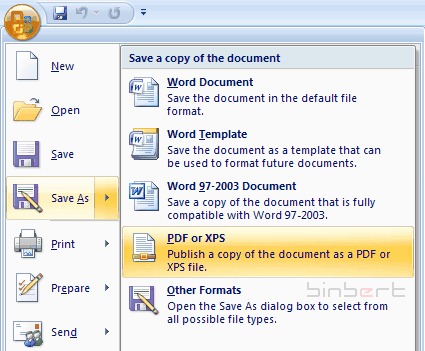
pdf save as
Microsoft is offering this plug-in on their homepage that adds pdf support to Office 2007 adding PDF as one of the options in the Save As dialog box. It is the most effective way to add support for PDF documents to Microsoft Office 2007.
Download and Install the  2007 Microsoft Office Add-in

How to recover permanently deleted mails from Microsoft Outlook


Some of us delete the mails for keeping the mailbox minimum size as possible. Sometimes we may think about to recover the deleted mails. Besides that, the emails in the mailbox could also be removed automatically after a certain time period due to the emails retention policy configured by the email server administrator. Recovering the emails deleted using Delete button or the Delete key is undertaking.But is it still possible to recover the emails which were permanently deleted using “Shift+Delete” or emptied from the Deleted items folder. Recovery steps as follows, if the mailbox in Microsoft Outlook is hosted in Microsoft Exchange Server:
  • For Microsoft Outlook 2010

  1. Select the folder which previously stored the deleted email e.g. Inbox, Deleted Items.
  2. Click at Recover Deleted Items button from the Folder tab.
  3. A separate window with the list of recoverable emails appears.
  4. Highlight the emails to be recovered and hit the envelope button to restore the email.
  • For Microsoft Outlook 2007

  1. Select the folder which previously stored the deleted email e.g. Inbox, Deleted Items.
  2. Select “Recover Deleted Items” from the Tools menu.
  3. The email recovery window appears with the list of recoverable emails.
  4. Select the email to be recovered and click the envelope icon button to resurrect the emails.

Saturday, March 05, 2011

How to back up your Gmail online ?


1. POP to alternate email account
This method is very similar to the first method above, but instead of exporting your email to a local client, you’re going to forward it to an alternate email account, ideally something different from Gmail just to be completely sure, likeYahoo Mail or Hotmail. Just a reminder: select “Enable POP for all mail (even mail that’s already been downloaded)” if you want to back up your old emails as well.
2. Hotmail TrueSwitch
Hotmail TrueSwitch is a quick and easy way to copy your mail, contacts and calendar from Gmail to your Hotmail account. Simply enter your details and it will automatically copy your Gmail emails and contacts to your Windows Live Hotmail account. With this tool, you can also choose to forward your future emails.

Monday, February 14, 2011

[Tip]Know the creation date of your Gmail even if first message is deleted

Gmail account creation date is very much significant related to security issues as if you forget your password as well as security questions then these informations are used to give back your account to you. Previously there was a methodavailable on the net but if in case you have deleted the first e-mail sent by the gmail team [like me] then there was apperently no other process to find your email. Well not actually! There is still a hope for uswink
I was configuring my blakut.com email [given to me by kaushik] to forward all the email to my regularly used Gmail, when I found this trick. As I have previously deleted the first message sent by gmail team so I was in no way able to find the date when I created my account, until I discovered this trick todaymrgreen
Its quite easy! Here is what you need to do
    1. Goto the settings page from your email box

  1.  
    1. ection
    2. Now search for the line
      1. Status: POP is enabled for all mail that has arrived since ….
      as shown in the picture below
      Click to enlarge

Friday, February 04, 2011

Facebook keyboard shortcuts

Alt + 1 Return to Facebook Homepage
Alt + 2 To goto Wall tab of your profile page
Alt + 3 To view Friends Requests list drop down list
Alt + 4 To view latest Messages list in drop down list
Alt + 5  To view Notification list drop down list
Alt + 6 To goto Account setting webpage
Alt + 7 To goto Account privacy configuration webpage
Alt + 8 To open Facebook fan page at facebook.com/facebook
Alt + 9 To open Facebook’s Statement of Rights & Responsibilities
Alt + 0  To open Facebook Help Center
Alt + m To create new message
Alt + ? For cursor control in the Search Box

Tuesday, January 25, 2011

SPEED UP UR ACROBAT READER (ALMOST LIKE NOTEPAD)

See full size image
1. Go to the        installation folder of acrobat reader
      (C:\program files\adobe\acrobat\reader\.. whatever)


      2. Move all the files and folders from the "plugins" directory to the        "Optional" directory. (I repeat.. cut and paste the files NOT copy &        paste).

      Also make sure that acrobat reader is not open else it will lock the files        and not allow you to move the files).

      Now your acrobat reader will load very fast and almost as good as        notepad..

How to "Delete administrator Password" without any software

Boot  up with DOS and delete the sam.exe and sam.log files from  Windows\system32\config in your hard drive. Now when you boot up in NT  the password on your built-in administrator account which will be blank  (i.e No password). This solution works only if your hard drive is FAT  kind.

Method 2

Step 
1.<!--[endif]-->Put your hard  disk of your computer in any other pc .<!--[if !supportLists]-->Step   2.<!--[endif]-->Boot that  computer and use your hard disk as a secondary hard disk (D'nt boot as  primary hard disk ).<!--[if !supportLists]-->Step  3.<!--[endif]-->Then open that  drive in which the victim’s window(or your window) is installed.

<!--[if !supportLists]-->Step  4.<!--[endif]-->Go to location windows->system32->config<!--[if !supportLists]-->Step  5.<!--[endif]-->And delete  SAM.exe and SAM.log
<!--[if !supportLists]-->Step  6.<!--[endif]-->Now remove  hard  disk and put in your computer